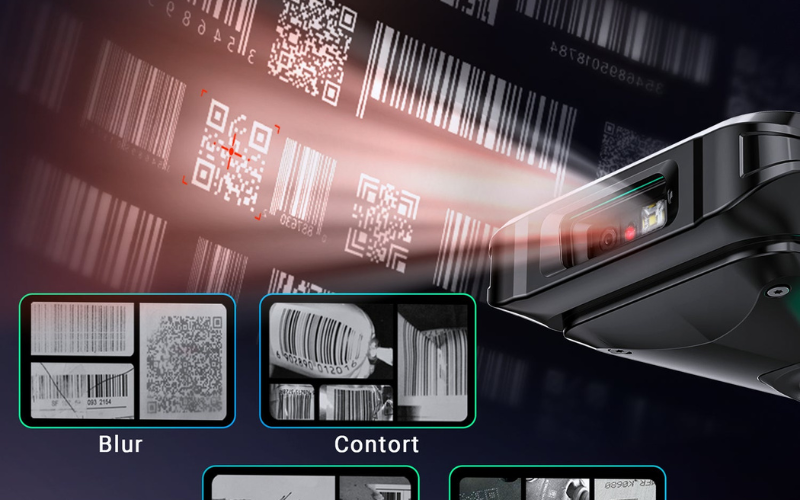
Ever notice how a barcode looks clear to your eyes, yet your scanner still can’t read it?
In most cases, the problem isn’t the label, the printer, or the app—it’s the wrong resolution. A scanner that can’t see your bar width simply can’t decode it, no matter how much you tweak settings or lighting.
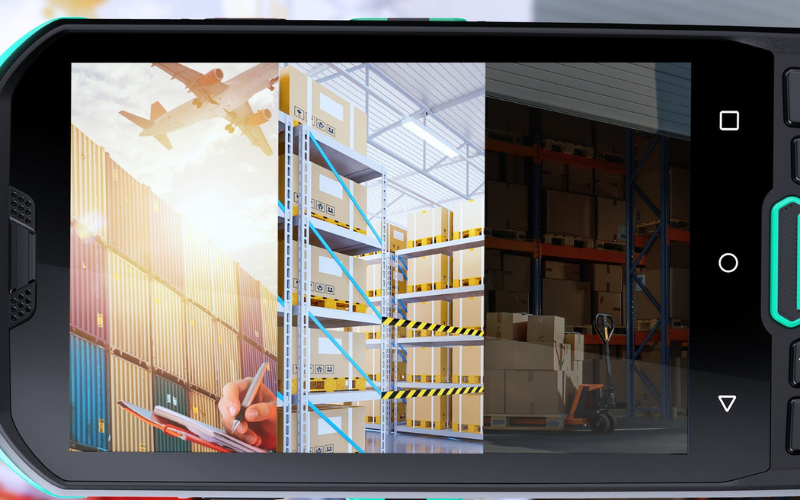
This guide gives you a clear, practical way to understand barcode scanner resolution, including what “mil” really means, how it affects accuracy and distance, and how to choose the right level for 1D, 2D, and high-density codes. You’ll also learn how to test any scanner yourself and when a high-resolution Android barcode scanner (like those used in modern warehouse and manufacturing workflows) makes a measurable difference.
What Is Barcode Scanner Resolution?
Barcode scanner resolution is the smallest bar or module size your scanner can read. This number tells you how fine a code your device can decode. If the elements are smaller than the scanner’s limit, the code will not read.
- Barcode resolution describes how small the printed bars or modules are.
- Scanner resolution shows the smallest element your scanner can detect.
- Image resolution or DPI tells you how many dots a printer places in one inch.
When people measure barcode quality, they use mil. One mil equals 0.001 inch, and it shows the width of the narrowest bar or module in the code. The scanner’s real performance depends on how many mil it can read, not on the printer’s DPI number.
DPI affects how clean the code looks, but mil matters more because it controls whether the scanner can decode the symbol at all.
- For 1D barcodes, the scanner must see clear narrow bars.
- For 2D barcodes, the scanner must capture tiny modules across the entire pattern.
Codes with very dense patterns, such as Data Matrix or small QR codes, usually require higher scanner resolution.
You know what scanner resolution means, but how does it change your actual scanning accuracy?
How Resolution Affects Barcode Scanning Accuracy
Barcode scanner resolution affects accuracy because it defines the smallest bar or module the device can clearly see. When every narrow bar or tiny square is above this limit, the scanner gets a sharp image and decodes reliably. Once elements drop below that limit, details blur together and accuracy falls, even if the barcode still looks fine to the human eye.
Each scanner has a minimum bar or module size (its mil rating). If your barcode uses elements larger than this size, the scanner can separate each bar or module and you get fast, stable reads. If the elements are smaller, the scanner is effectively guessing where one bar ends and the next begins, which leads to more no-reads and misreads.
This is most obvious with high-density barcodes such as DataMatrix, QR, and PDF417, where modules can be only 3–5 mil wide on electronics or medical labels. To read these reliably, the scanner’s minimum mil rating must be equal to or smaller than your actual module size. Matching scanner resolution to your smallest barcode is therefore one of the simplest ways to keep accuracy high in everyday work.
Resolution explains what your scanner can see, but to control how well barcodes are printed and read, you also need to understand the difference between DPI and mil.

DPI vs Mil: What Really Matters
DPI controls how detailed the barcode is printed, but mil controls whether the scanner can read the smallest parts of the code. This is the key difference, and it explains why a barcode can look sharp on paper but still fail to scan.
DPI, or dots per inch, describes the printer’s detail level. Higher DPI makes cleaner lines and smoother edges, and it can help keep the printed bars close to their intended size. DPI affects how the barcode looks on the label, but it does not tell you if the scanner can actually read it.
Mil measures the smallest bar or module the scanner can detect. One mil equals 0.001 inch. A scanner with a lower mil rating can see finer details, so it can decode smaller or denser barcodes. If the bars in your code are smaller than the scanner’s mil limit, the device will miss shapes and fail, even if the code was printed at high DPI.
The simple truth is this: printing quality depends on DPI, but scanning success depends on mil. A high-DPI code can still fail if the bars are too small for the scanner. A lower-DPI code can still read well if the bar sizes match the scanner’s mil rating.
|
Setting |
What It Controls |
Real Impact |
|---|---|---|
|
DPI |
Printed detail |
Cleaner lines and more accurate bar shapes |
|
Mil |
Scanner’s minimum readable size |
Whether the scanner can decode the barcode |
Understanding this difference helps you match your printer and scanner correctly, so the printed bars stay clear and the scanner can see the details it needs.
You now know how DPI and mil work, so the next step is to see how much resolution different barcodes actually need.
Minimum Resolution Requirements for Common Barcodes
Different barcode types use different bar or module sizes, which directly determines the scanner resolution they require. 1D codes rely on narrow bars—wide bars are easy to read, but thin bars demand better resolution. 2D codes use small square modules that can be much finer than 1D bars, so dense symbols often need scanners with lower mil ratings.
In general, retail codes like UPC/EAN have larger bars and work well with standard-resolution scanners. Mid-density formats such as Code 128 or typical QR Codes usually need around 5–10 mil capability. Truly dense symbols—especially DataMatrix or Micro QR on electronics and medical labels—often use modules in the 3–5 mil range and therefore require high-resolution scanners.
Put simply, the smaller the module, the higher the scanner resolution you need. The table below shows common barcode types and the typical mil ratings used to read them reliably.
|
Barcode Type |
Typical Minimum Bar/Module Size |
Recommended Scanner Resolution |
|---|---|---|
|
UPC / EAN |
Larger bars |
Standard resolution (≈10–13 mil) |
|
Code 128 |
Medium bars |
5–10 mil scanner |
|
DataMatrix |
Small modules |
3–7 mil scanner |
|
QR Code |
Medium modules |
5–10 mil scanner |
|
Micro QR / Tiny Codes |
Very small modules |
High-resolution scanner (≤3–5 mil) |
You know how much resolution each barcode needs, but what happens when the scanner does not meet that requirement?
Common Problems Caused by Low Resolution (Troubleshooting Guide)
Low resolution rarely appears as a clear error message. Instead, it looks like small labels that never scan, very short working distances, or slow, unstable reads.
Scanner Cannot Read Small Barcodes
Common Symptoms
You may notice that:
- Larger barcodes scan, but small labels almost never read
- The scanner beeps for error or shows “no read” repeatedly
- The small code looks clear to your eyes, but the device cannot detect it
Likely Cause (Low Resolution)
Small barcodes often have bars or modules that are smaller than your scanner’s minimum bar width (mil rating).The scanner image does not contain enough detail for the decode engine to separate each bar or module.If you ask “Why can't my scanner read small barcodes?”, the usual reason is that the code is finer than the scanner’s resolution limit.
How To Fix It
- Print the same data in a larger barcode. If the larger code scans while the tiny one does not, resolution is the problem.
- Check your scanner’s minimum mil rating and compare it with your label size.
- Increase barcode size or reduce density, if your application allows it.
- If size cannot change, upgrade to a higher resolution scanner (often a 2D imager or Android mobile computer).
Scanning Distance Issues
Common Symptoms
- Small barcodes only read at very close range
- Pulling back even slightly causes no-reads
- Larger barcodes still read from normal distances
Likely Cause (Low Resolution): At longer distances, tiny bars or modules take up fewer pixels in the scanner image. With low resolution, these details fall below the scanner’s limit. The code remains on the label, but the scanner cannot see enough detail to decode it at that distance.
How To Fix It
- Test the barcode at different distances. If only close-range scans work, resolution and optics are mismatched to the code size.
- Use closer scanning as a temporary workaround.
- For small labels that must scan from farther away, choose a higher resolution scanner with optics designed for dense codes.
Slow Reads and Frequent Retries
Common Symptoms
- You must hold the aimer on the code for a long moment
- The scanner reads sometimes, but needs several tries
- Large barcodes scan fast, but small/dense codes are unstable
Likely Cause (Low Resolution): Your barcode is close to the scanner’s resolution limit. The scanner can almost see enough detail, but not fully. The decode engine must guess and retry, which slows everything down.
How To Fix It
- Test a larger or lower-density version of the same barcode. If it scans faster, low resolution is the cause.
- Check with your label supplier if bar width or module size recently changed.
- If you cannot change label size, upgrade to a scanner with a lower mil rating.
When You Should Upgrade to a High-Resolution Scanner
You may need a higher resolution scanner when:
- Small barcodes rarely read, even with good print quality
- Operators must scan extremely close to the label
- Dense barcodes like DataMatrix, Micro QR, or tiny QR codes are always slow
- Your work involves electronics, medical devices, or small parts where codes are often 3–5 mil
Higher resolution scanners—often advanced 2D imagers or Android mobile computers—provide finer detail, allowing clean reads on small or dense barcodes where low-resolution scanners struggle.
After seeing what low resolution can break, it’s time to pick the right resolution for your real-world use case.
How To Choose the Right Barcode Scanner Resolution for Your Application
The best way to choose scanner resolution is to start from your barcodes, not from the device catalog. If you know what your codes look like and how you scan them, you can match the mil rating to your real work instead of guessing.
Step-By-Step Guide You Can Use in Any Industry
Step 1: Check your barcode type and size: Look at your labels first. Are they 1D barcodes with lines (like UPC, EAN, Code 128), or 2D codes with small squares (like QR, DataMatrix)? Ask yourself: Are my barcodes big and simple, or small and dense? Smaller and denser codes always need higher resolution (lower mil).
Step 2: Think about your working distance: Do you scan very close at a counter, at arm’s length in aisles, or from a bit farther away on shelves, pallets, or machines? If you try to read small barcodes from farther away, you need a scanner with more resolution so each tiny bar or module still has enough detail in the image.
Step 3: Read the scanner’s minimum mil rating: On the spec sheet, find the minimum x mil the scanner can decode. Typical ranges look like:
- ≈10–13 mil: fine for larger retail barcodes
- ≈5–10 mil: good for most warehouse and logistics labels
- ≈3–7 mil: better for small, dense 1D/2D codes
- ≈2–3 mil: for very tiny codes, Micro QR, or DPM marks
A rugged Android mobile computer such as Tera P166 / P166GC with the Zebra SE4710 is a good example of a scanner engine designed to read high-density 1D and 2D codes in many environments, while devices like P400 or P172 show how different form factors and batteries can be built around similar scanning needs.
Step 4: Match the mil rating to your smallest bar or module: Your scanner’s minimum mil should be lower than or equal to the smallest bar or module you use. If your labels are big and simple, you do not need an ultra-low mil rating. If your labels are small or very dense, a high mil rating (for example, 13 mil only) will cause no-reads, slow reads, or short working distances.
Step 5: Test with your real labels and real workflow
Before you decide, test with:
- Your actual label size
- Your real scanning distance
- Your real lighting and surfaces
If you must move very close, change angles often, or scan many times for small codes, your resolution is not a good match. In that case, consider a higher-resolution mobile computer (for example, P166GC in a smart warehouse) or even a specialized high-precision scanner such as Tera 8300Pro DPM or 8100DPM Pro when you deal with tiny or DPM codes.
Resolution Reference by Industry (Quick Lookup)
The table below gives typical resolution needs for common application areas. These are not strict rules, but they help you choose a safe starting mil level. Example devices are given only as supporting cases, not as the only option.
|
Typical Barcodes |
Typical Label Size |
Recommended Scanner Resolution (Mil) |
Example Device Type (Supporting Only) |
|---|---|---|---|
|
UPC / EAN |
Medium to large product labels, shelf tags |
≈10–13 mil (standard resolution) |
Android handheld like P166 at shelf; fixed / cordless scanner at checkout |
|
Code 128, UPC / EAN, 2D shipping codes |
Cartons, pallets, rack labels |
≈5–10 mil (flexible mid-range) |
Rugged Android PDA such as P166GC or P400 with 2D imager |
|
Small Code 128, DataMatrix |
Small bin / part labels |
≈3–7 mil (high-resolution 2D) |
Android mobile computer like P172 plus, if needed, a high-precision handheld |
|
DataMatrix, small QR |
Small UDI labels on boxes, vials, devices |
≈3–5 mil (dense 2D focus) |
High-resolution Android scanner (e.g., P172) for UDI capture |
|
DataMatrix, Micro QR, DPM marks |
Very small codes on PCBs, chips, metal parts |
≈2–3 mil (very high resolution / DPM) |
Industrial DPM scanners like 8300Pro DPM / 8100DPM Pro, paired with Android terminals |
Use this table as a quick check, not a hard rule. First follow the step-by-step method to understand your own barcodes and distances. Then use the table to see which mil range is usually safe for your industry, and finally choose an Android barcode scanner or mobile computer that offers that resolution plus the battery, ruggedness, and wireless features your team needs.
Now that you know how to choose the right resolution, let’s look at why high-resolution Android scanners have become the top choice in 2025.
Why High-Resolution Android Scanners Are Dominating 2025
In 2025, high-resolution Android barcode scanners are popular because they combine a strong 2D scanner, a smart phone-like computer, and stable wireless connections in one device. This makes them better for modern barcodes and real-time data than many old laser guns or simple USB scanners.
CMOS 2D Imagers Outperform Legacy Laser Scanners
Old laser scanners are good at simple 1D barcodes, but they often struggle with dense 2D codes, labels on screens, and damaged labels.
Android scanners like Tera P166, P166GC, and P172 use CMOS 2D imagers such as Zebra SE4710. These imagers capture a full image of the code, so they can read 1D and 2D barcodes, including high-density and slightly blurred labels, in one shot. For mixed labels in retail, warehouses, or factories, this is more practical than a legacy laser line.

Higher Pixel Sensors Help With Small And Dense Codes
As barcodes become smaller, the scanner needs more detail to see each tiny bar or module. Higher pixel sensors give more detail, so the decoder can separate shapes instead of guessing.
Android mobile computers such as P172 or P400 pair high-performance imagers with rugged housings and long battery life. In real use, this means they can handle small or dense codes on bins, parts, and cartons more reliably than low-resolution devices, especially when you cannot make the label bigger.
AI-Based Decoding On Android
A simple scanner has fixed logic. An Android scanner has a full CPU and OS, so it can run apps, OCR tools, and smarter decoding software.
Devices like P166 (Snapdragon 450), P166GC (Snapdragon 6115), and P172 (Mediatek octa-core) can: process images on-device, apply business rules inside your app, and improve decoding on hard labels by using better algorithms over time. As software improves, you can update the app instead of replacing the hardware.
Connectivity For Real-Time Barcode Data
Today, a scan is not just a beep. It usually needs to update WMS, ERP, or MES systems in real time. For that, you need good wireless.
Android barcode scanners support Wi-Fi and often mobile networks. For example, P166GC is Wi-Fi 6 Ready, which helps in busy smart warehouses where many devices share one network. Models like P166, P400, and P172 combine rugged design, large batteries, and dual-band Wi-Fi, so workers can move freely while each scan goes straight into your system without extra steps.
In short, high-resolution Android barcode scanners are winning because they offer better imaging, smarter decoding, and live connectivity in one handheld. That is why, when you plan your next upgrade, it makes sense to treat the scanner as an Android mobile computer platform, not just a simple gun that reads a single line of bars.
Android scanners are powerful, but how do you check if a device truly handles 3–10 mil barcodes? The answer is a simple resolution performance test.
How to Test a Scanner’s Real Resolution
A barcode scanner’s real resolution is not what the spec sheet says, but what it can read on real labels at real working distances. The tests below help you check that in a simple, repeatable way.
Test Charts (3–20 Mil): Find the True Minimum Resolution
A resolution chart contains barcodes printed at different mil values—for example, 20, 15, 10, 7, 5, 3 mil. It is the fastest way to measure a scanner’s real ability to read fine details.
How to use it
- Place the chart on a flat, well-lit surface.
- Scan from a normal working distance.
- Start from larger codes and move down to smaller ones.
- Record the smallest mil value the scanner can read quickly and repeatedly.
This value is your scanner’s effective minimum resolution in your environment.
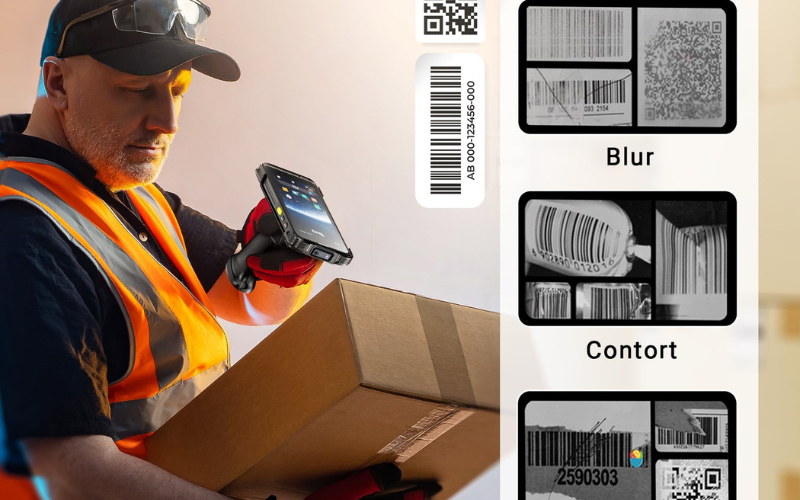
Print Quality Testing: Confirm the Label Is Not the Problem
Many scanning issues come from the barcode itself, not the scanner. Low contrast, fuzzy edges, poor quiet zones, wrinkles, glare, or worn print can all cause failures that look like “low resolution”.
How to check print quality
- Prepare both a clean label and a low-quality version of the same code.
- Scan both under the same conditions.
- If the clean one reads but the poor one does not → print quality issue.
- If both fail when the code is small or dense → resolution limit.
This prevents you from blaming the scanner when the barcode is the real problem.
Distance vs Resolution: Build a Simple Distance Chart
A scanner may read a small code only at close range. As you move farther away, the fine details shrink in the image and eventually fall below the scanner’s resolution.
How to test
- Choose a small barcode that matters to your workflow.
- Start scanning at a very close distance.
- Move back step by step.
- Note the maximum distance where the scanner still reads the code quickly and consistently.
This shows your real working distance window. If the window is too narrow, you likely need a higher-resolution scanner or different optics.
Resolution is not a theoretical number. It is a practical limit you can measure. Using test charts, print checks, and distance tests gives you the clearest picture of how well a scanner will perform with your own labels—before you deploy it in real work.
FAQs
Does DPI Matter in Barcode Scanning?
Yes, DPI matters for how clearly the barcode is printed, but it does not decide whether the scanner can read it. Higher DPI can make bars and modules sharper and closer to their ideal size, which helps the scanner. However, the true reading limit comes from the scanner’s resolution in mil (its minimum bar or module size), not the DPI number alone.
Is 300 DPI Enough?
300 DPI is enough for many standard barcodes, but it may not be sufficient for very small or high-density codes. For normal retail and warehouse labels, a clean 300 DPI print usually works well. When barcodes are tiny or packed with data, you may need a higher DPI printer, a larger symbol, or a scanner with a lower mil rating to keep reads stable.
3 Mil vs 5 Mil: What’s the Difference?
The key difference is that a 3 mil scanner can read finer details than a 5 mil scanner. 3 mil capability is used for very small or dense barcodes, such as tiny DataMatrix or QR codes. 5 mil scanners are better for compact but not extreme barcodes, like small Code 128 or moderate-size 2D codes on labels and trays.
What Resolution Scanner Do I Need for High-Density Codes?
For most high-density codes, you typically need a scanner that can read around 3–5 mil modules. This range works for tight DataMatrix and small QR codes on labels used in electronics, medical, and micro-parts tracking. If your symbols are extremely small or directly marked on parts, a scanner designed for very low mil values or DPM is usually the safer choice.
Can a Mobile Phone Camera Read Tiny Barcodes?
Sometimes, but phone cameras are less reliable on tiny or very dense barcodes than dedicated scanners. Phones are tuned for photos, not for fast decoding of small symbols at close range. For micro barcodes or all-day scanning, a purpose-built barcode scanner or Android mobile computer with a high-resolution imager usually gives faster, more stable results.
Conclusion: Start With Resolution, Then Choose the Device
Resolution is the first decision; the device comes second. Once you know the mil level your barcodes require, choosing a scanner or Android mobile computer becomes simple matching—not guesswork. If you want help confirming the right resolution for your labels, you can contact Tera for a free resolution check. Our team can quickly review your barcodes and guide you to the scanning performance that fits your real workflow.